Halloween Blinking Creature Eyes with LEDs, Arduino, and Laser Cutting

I made this blinking-creature-eyes lamp as a small gift for my father, who loves to scare neigborhood children during Halloween with a heavily decorated entryway. It's suitable for hiding in foliage, under a chair or couch, in a darkened window, etc. You can make one easily if you have a laser cutter and some way of making printed circuit boards, although a cardboard box with cutout eyes and some LED strip would work just fine as a quick way to get started.
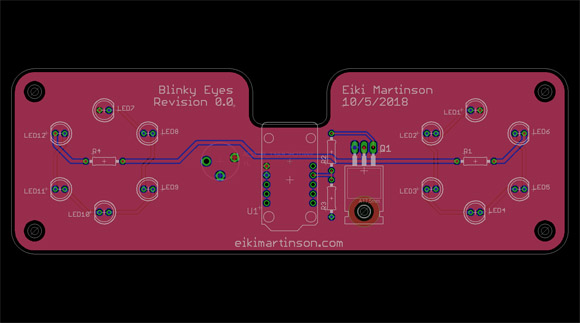
PCB design in Eagle
This design was heavily determined by parts I happened to have on hand. The LEDs are high-brightness red 5mm devices; I bought a whole sack of these once from Electronics Goldmine (they made an appeance in the Goldfinger laser among other projects). Although I could have controlled the blinking with a 555 timer or similar circuit, I had some surplus Arduino Trinkets from Adafruit, and programmability is nice to have in a project like this one.
I decided on a 12V wall-wart power supply, which gave me enough voltage to drive a string of six LEDs with a little room to spare for the current-limiting resistor (in my case the LEDs have a forward voltage of 1.6V). To switch them I used an IRF840 MOSFET in a TO-220 package. This is absurdly over-capable (8.0 A at 25 °C!) for this application but once again, I had them already. Feel free to substitute something more appropriately sized. Download the complete schematic and Gerbers here:
Resistors R2 and R3 are just standard 1/4 W axial-leaded types; values are not critical at all. R1 and R4 are for limiting the LED current—select these according to your particular LEDs (also left unspecified) and how bright you want them to be. Here are the other parts you'll need:
| Designator | Qty. | Manufacturer and Part Number | Description | Vendor |
| U1 | 1 | Adafruit 1501 | Arduino Trinket, 5V * | Adafruit |
| J1 | 1 | Switchcraft PC722A | DC barrel jack, 5.5mm x 2.1 mm | Mouser |
| Q1 | 1 | Vishay IRF840PBF | N-Channel MOSFET | Mouser |
* I used the older, Mini USB version of the Trinket, but the dimensions and pinout haven't changed much so the newer one should be fine too.↩
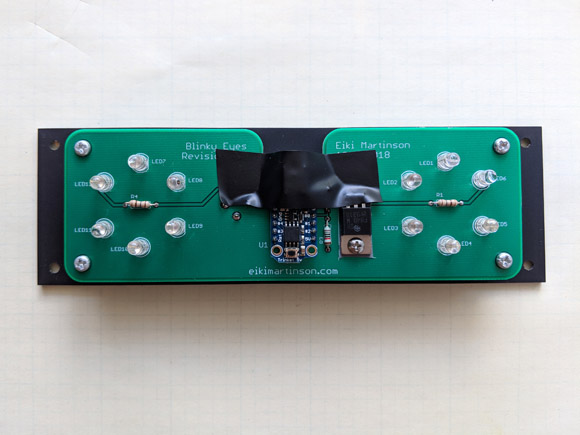
Assembled PCB, with electrical tape covering the power LED of the Trinket board
I designed the enclosure using Onshape and Adobe Illustrator and cut it from 1/8 inch thick acrylic with a 40W hobby laser cutter. The DC input jack is on the bottom side of the PCB and sticks out through the rear of the lamp. All of the black acrylic is P95 sheet with one matte and one glossy face. I've mostly used the matte side facing out, as this is a theatrical prop and you want everything but the eyes themselves to disappear, but I reversed the rear panel for an interesting contrast. I also engraved the rear panel with my name, the year, and some information about the power requirements. This is mostly for my own benefit so that I can replace the power adapter if necessary without having to dig into my notes.

Rear panel with laser engraving
I glued a piece of translucent P95 acrylic behind the front panel to cover the eye cutouts.

On its own the frosted acrylic proved inadequte to fully diffuse the light from the LEDs, so I supplemented it with four or five thicknesses of folded parchment paper (a great low-power light diffuser I've used before).
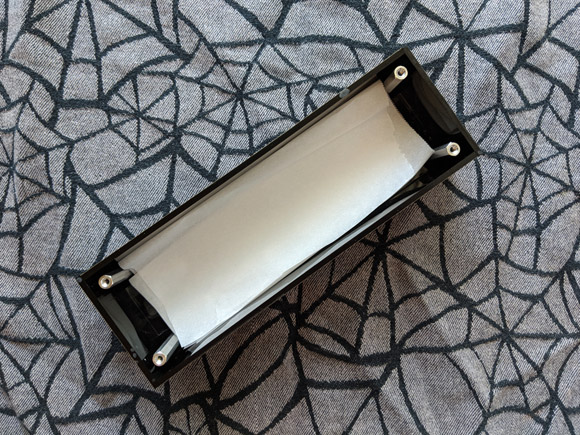
Parchment paper inside enclosure
I built the case by solvent bonding the front, sides, top and bottom to each other, after first temporarily assembling them with painter's tape. Some aluminum standoffs attach the PCB to the rear panel, and the rear panel to the rest of the case. The outside screws are countersunk 6-32 x 5/16" in stainless steel with a black-oxide finish.
To achieve a blinking effect, the Arduino runs through a loop selecting random on and off times, within ranges chosen so that the eyes are mostly open with short closed periods. The code is trivially easy but here it is anyway:
#define FET 0

long ontime, offtime;

void setup() {
  pinMode(FET, OUTPUT);
}

void loop() {
    ontime = random(500, 3 000);
    digitalWrite(FET, HIGH);
    delay(ontime);
    offtime = random(100, 1000);
    digitalWrite(FET, LOW);
    delay(offtime);
}
And here are the mechanical parts if you'd like to build this for yourself:
Happy Halloween!